
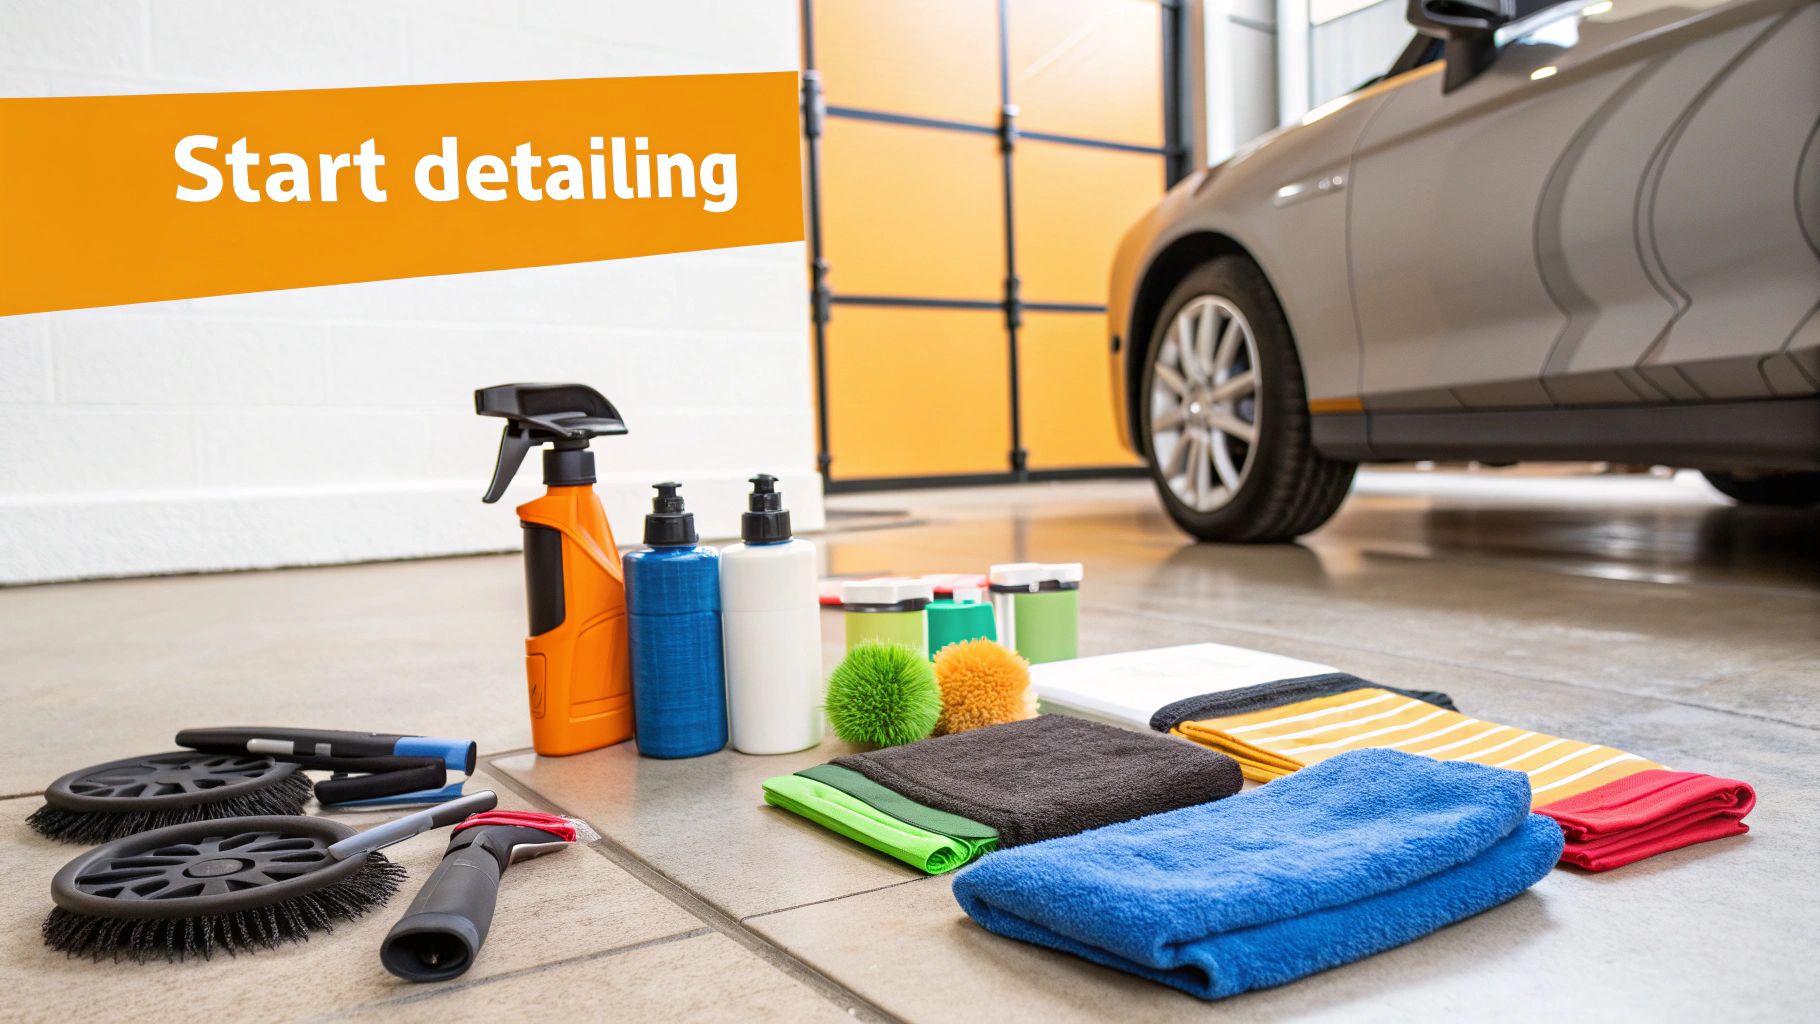
Dipping your toes into the world of car detailing can feel like you're staring at an endless aisle of products. It’s easy to get overwhelmed. But the truth is, you don’t need a garage full of gear to get that showroom look. The real car detailing equipment for beginners comes down to just a few key things: the right tools for a scratch-free wash and dry, the basics for cleaning your interior, and a solid product to protect your paint.
Get these right, and you're already 90% of the way to achieving professional results right in your own driveway.
Your First Steps in Car Detailing
Welcome to the incredibly satisfying world of car detailing! This guide is here to cut through the noise and confusion that so many newcomers face. It’s easy to get lost in a sea of polishes, compounds, waxes, and weird-looking tools, but we’re going to simplify all of that for you.
Our mission is to give you a clear, no-nonsense list of what you actually need to get started. We'll separate the absolute essentials from the "nice-to-haves" that you can always pick up later. Think of this as your roadmap from a basic car wash to a complete, head-turning detail.
Building Your Starter Kit
The journey from weekend washer to detailing enthusiast isn't about buying the most expensive gear. It’s about understanding how a few high-quality, essential items work together to make your car look incredible. We'll focus on the big three:
- Washing & Drying Tools: The absolute must-haves for preventing those dreaded swirls and scratches.
- Interior Cleaning Essentials: What you truly need to get the inside of your car looking and feeling brand new.
- Simple Paint Protection: Easy, effective ways to lock in that shine and protect your hard work.
By the time you're done here, you’ll realize that a professional-level finish is completely within your reach. You'll be joining a growing community of enthusiasts, too. In the U.S. alone, the car wash and auto detailing industry is expected to grow to $20.7 billion by 2025. You can read more about the detailing industry's impressive growth to see just how popular this has become.
This guide is all about building your confidence. We’ll show you that a jaw-dropping shine isn't magic—it's just a matter of having the right tools and a little bit of knowledge. Let’s get you started.
Mastering the Scratch-Free Wash and Dry
If there’s one mistake that makes experienced detailers cringe, it’s watching someone accidentally scratch their own paint while trying to wash it. This happens way more often than you'd think. When you drag trapped dirt and grit across your car's delicate finish, you're essentially washing it with fine-grit sandpaper. That's the fast track to ugly swirl marks.
Luckily, preventing this is surprisingly simple once you have the right foundational gear.
The absolute gold standard for a safe wash is the Two-Bucket Method. It’s a non-negotiable technique. Picture this: one bucket is for your fresh, soapy water—your clean supply. The second bucket is just plain water, and it acts as a rinse station for your dirty wash mitt. This simple separation makes all the difference.
Here’s how it works: after washing a single panel of your car, you dunk your mitt into the plain water bucket first. This releases all the dirt and grime you just picked up. Only after wringing it out do you dip it back into the clean, soapy water to tackle the next section. This simple step stops you from dragging the same abrasive particles all over your paint. To see this technique in action, check out this guide to the two-bucket wash method.
Your Secret Weapon Against Scratches
To really level up this method, each bucket needs a Grit Guard. This is a simple plastic insert that sits at the bottom of the bucket and acts as a one-way filter. Its special design lets all the heavy dirt and grit fall through to the bottom but stops the swirling water from kicking it all back up into your mitt.
Every time you rinse, you just gently rub your mitt against the Grit Guard's surface. This knocks loose any stubborn particles, trapping them safely at the bottom. It’s a brilliant little invention that ensures your mitt stays as clean as possible every time you reload it with soap.
Just how important is this setup? This visual breaks it down.
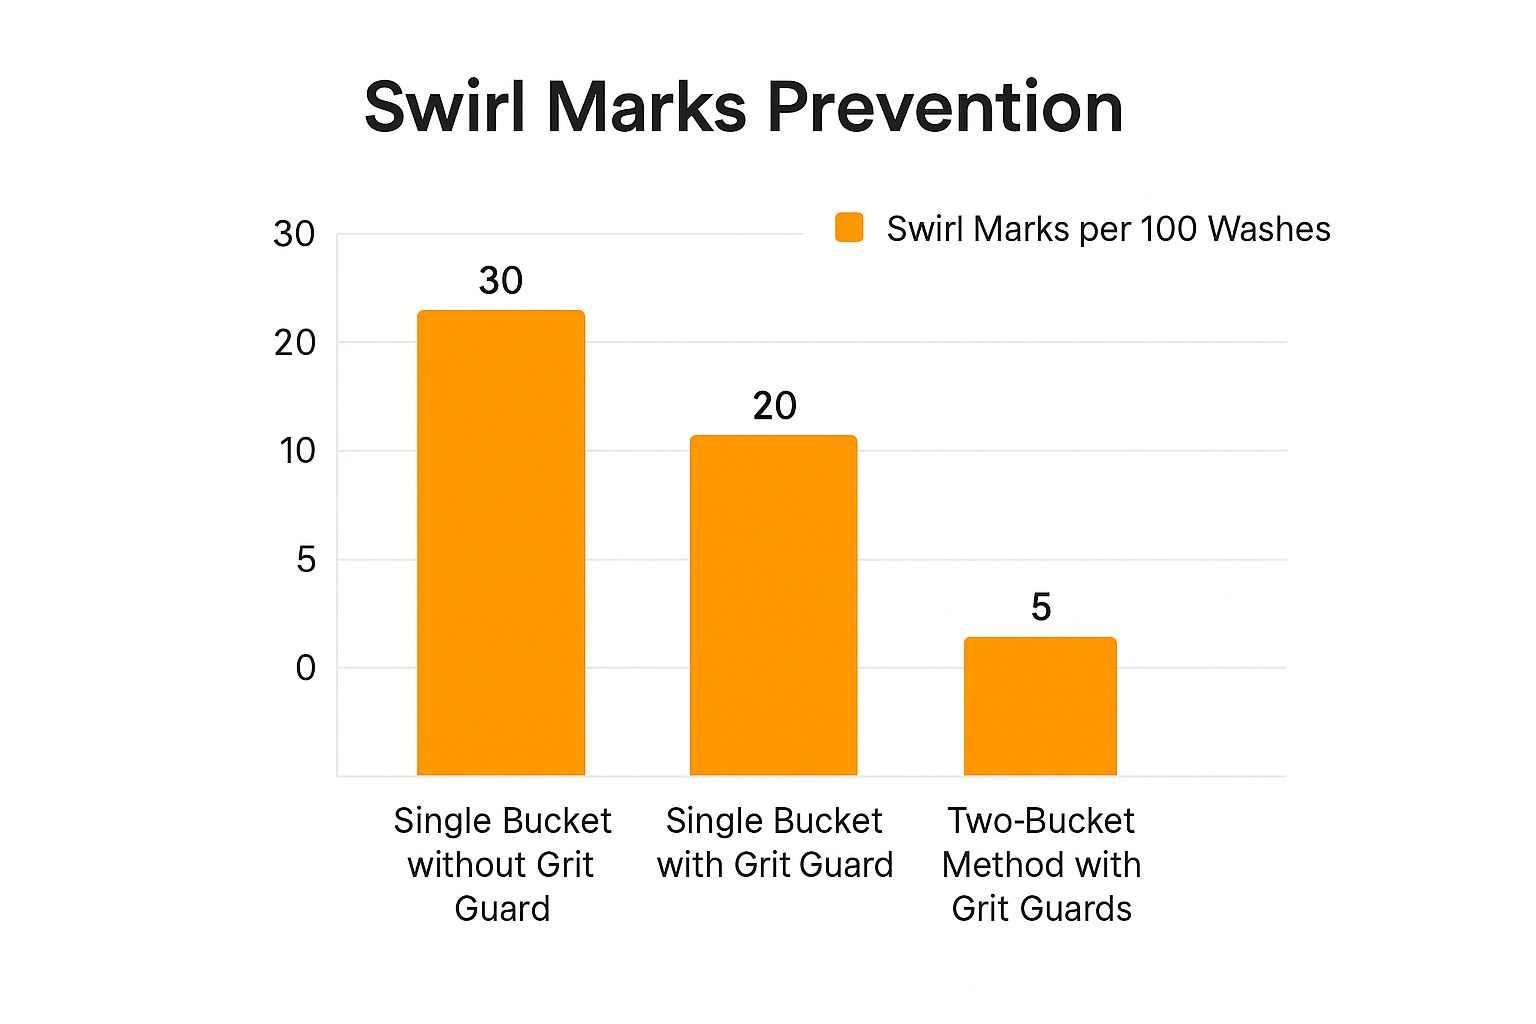
As you can see, combining two buckets with Grit Guards can slash the creation of swirl marks by over 80% compared to just using a single, unprotected bucket.
Choosing Your Wash and Dry Tools
Now that you understand the process, let's talk about the actual tools you'll be holding. A high-quality wash mitt and drying towel are just as crucial as the buckets.
1. The Wash Mitt
First thing's first: throw away any old sponges you have. Sponges have flat surfaces that are notorious for trapping grit right against your paint. Instead, you'll want a proper wash mitt made from one of these materials:
- Microfiber or Chenille: These are the workhorses of the detailing world. Their long, soft fibers act like tiny tentacles, pulling dirt away from the surface and deep into the mitt. They're tough, easy to clean, and the perfect choice for anyone starting out.
- Wool/Sheepskin: Think of these as the luxury option. They are incredibly soft and hold a massive amount of soapy water, which provides amazing lubrication. The downside? They need a bit more TLC to keep them in good shape.
For your first kit, a chenille microfiber wash mitt is the way to go. It gives you the best mix of safety, value, and durability. You really can't go wrong.
2. The Drying Towel
Just like washing, drying your car the wrong way can introduce scratches in a heartbeat. Forget about old leather chamois or repurposed bath towels. Your best friend here is a large, plush microfiber drying towel.
These towels are engineered to be ridiculously absorbent. A good one can soak up a shocking amount of water with just one gentle pass over the car. Their deep, soft pile pulls water away from the paint safely and efficiently. When you’re shopping, look for the GSM (grams per square meter) rating—anything over 800 GSM is going to give you that super-absorbent, super-safe drying power you need.
Ready to work smarter, not harder? While the Two-Bucket Method is a solid foundation for any detailer, a couple of key tools can take your wash game to the next level. Let's talk about the game-changers: the pressure washer and the foam cannon. These tools will not only speed up your process but also make it much safer for your car's paint.

Think of it this way: a garden hose is like a gentle rain shower. It gets the car wet, but it doesn't have the oomph to knock off stubborn grime. A pressure washer, however, is a focused, high-powered stream that blasts away loose dirt and contaminants before you ever touch the paint with a wash mitt. This is a huge step in preventing swirl marks.
For anyone just starting out, the key is choosing the right machine. You absolutely do not need a gas-powered beast that could peel the paint off a battleship. An electric pressure washer is the perfect entry point.
Choosing Your First Pressure Washer
When you start shopping, you’ll see two key numbers plastered on every box: PSI (pounds per square inch) and GPM (gallons per minute). Don't let them intimidate you. PSI is the cleaning force, while GPM is the rinsing power. Getting the balance right is what separates a safe, effective wash from a potential disaster.
To avoid damaging your car, you need to stay within a specific range for these specs. Here’s a quick guide to help you pick the right one.
Beginner-Friendly Pressure Washer Specifications
| Specification | Recommended Range for Beginners | Why It Matters |
|---|---|---|
| PSI (Pressure) | 1,200 to 1,900 PSI | This is the sweet spot. It's strong enough to lift dirt but gentle enough to be safe on clear coats, plastic trim, and emblems. Going higher risks damage. |
| GPM (Flow Rate) | 1.4 to 1.6 GPM | This measures the volume of water. A good flow rate helps carry away the dirt loosened by the pressure, making for a more effective rinse. |
| Nozzle Tip | 40-degree (white) tip | This is non-negotiable. The 40-degree tip creates a wide fan of water, spreading the pressure out safely. Never use a narrower tip on your paint. |
Remember, the goal is to pre-rinse effectively, not to sandblast your car. You want just enough power to do the heavy lifting so your contact wash is safer and easier.
The Magic of the Foam Cannon
Now, let's talk about the pressure washer's best friend: the foam cannon. This is an attachment that clicks onto the end of your pressure washer wand and completely changes the game. You fill its reservoir with a specialized car wash soap and water, and when you pull the trigger, it unleashes a thick, shaving-cream-like foam that blankets your entire vehicle.
This isn't just for show. This thick foam acts as a powerful pre-soak. It clings to the surface, giving the cleaning agents time to break down and encapsulate dirt, road film, and grit.
You can literally watch the grime start to drip off the car as the foam does its work. As it slides down the panels, it pulls all that loosened debris with it. By the time you rinse it off, most of the dangerous particles are already gone, dramatically reducing the risk of scratching the paint when you finally start your hand wash. It’s one of the most satisfying—and effective—steps you can add to your routine.
Essential Tools For A Pristine Interior
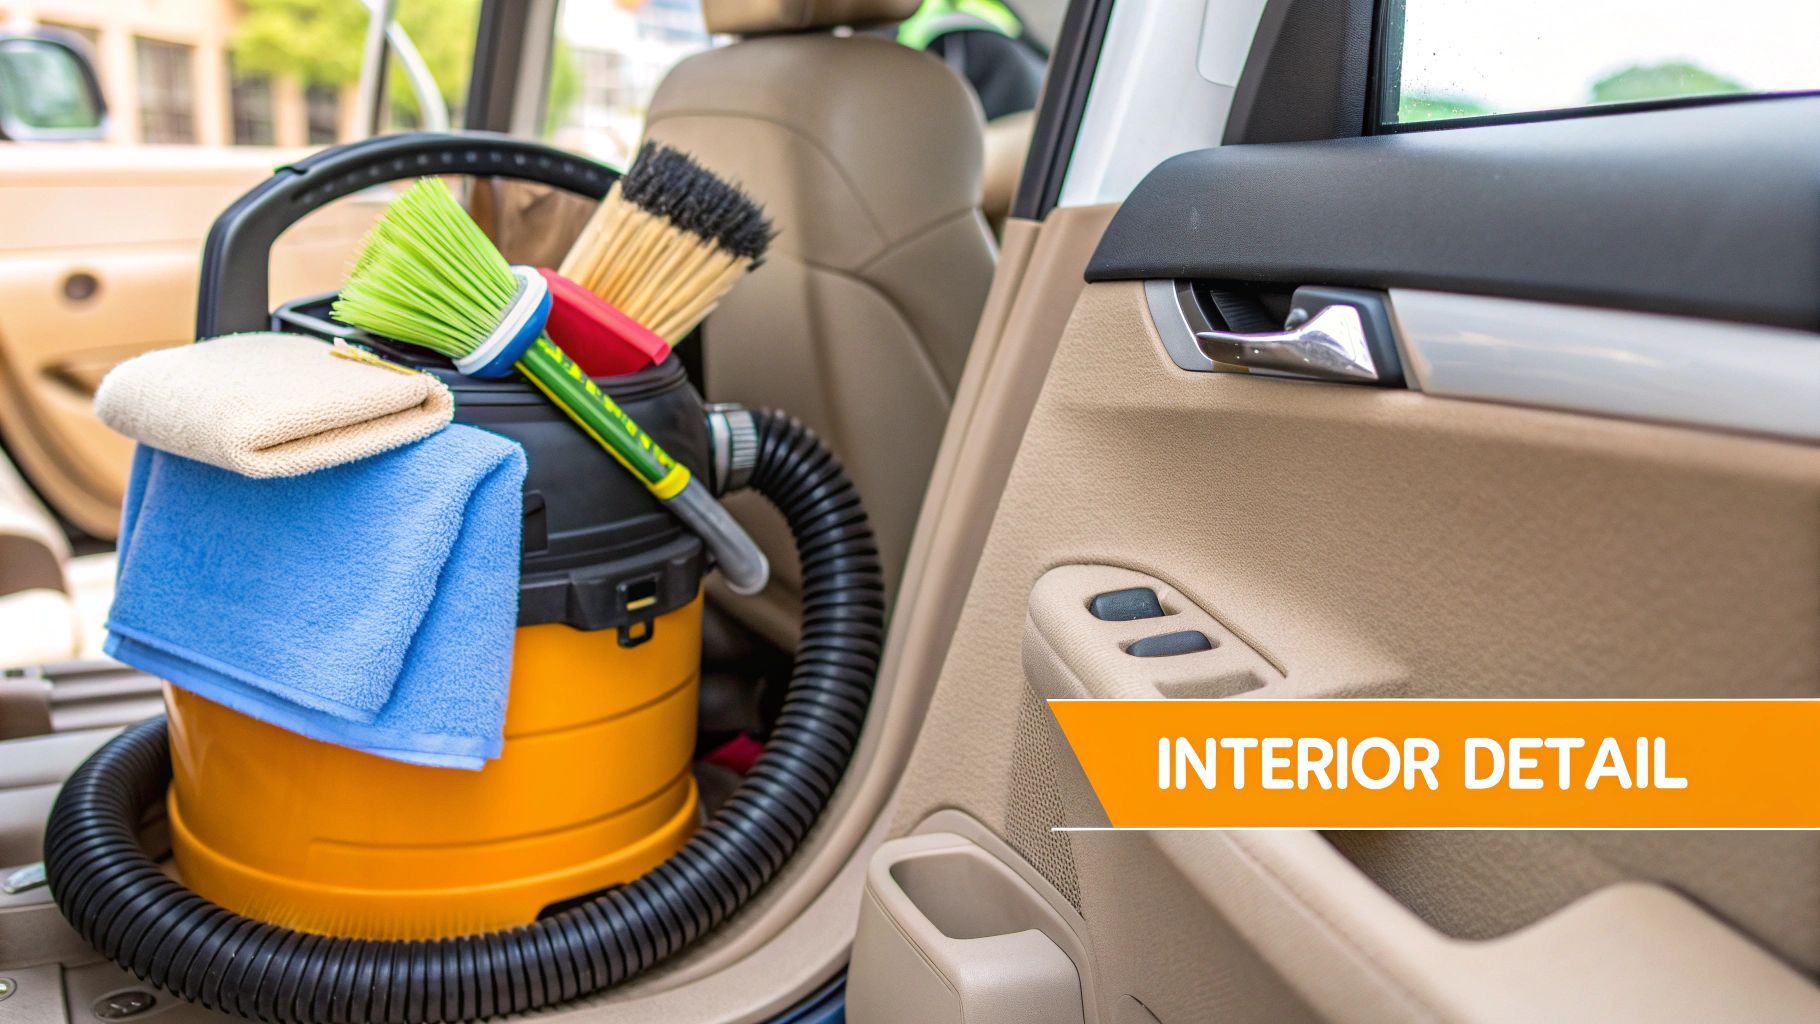
A gleaming exterior is one thing, but the real test of a clean car is the cabin—it's where you actually spend your time. So, let's shift our focus inside. Your absolute number one tool, the cornerstone of any interior detail, is a solid shop vacuum.
Your average household vacuum just won't cut it. They typically lack the raw suction power and, just as importantly, the specialized attachments needed to navigate a car's tight spaces. To really tackle ground-in dirt, spills, and whatever else ends up on the floor, a powerful wet/dry vacuum is a game-changer. The attachments are what truly make the difference; you'll find that a narrow crevice tool will quickly become your best friend for getting between seats and deep into console pockets.
Brushes And Cleaners For A Deeper Clean
Vacuuming gets the loose stuff, but what about the rest? This is where a dedicated set of detailing brushes comes into play. Think about it: you wouldn't scrub your tires and dust a piano with the same brush. That same logic is crucial inside your car.
A good starter kit of interior brushes should have a couple of key players:
- Ultra-soft brushes: These are your go-to for anything delicate. Use them to gently lift dust from infotainment screens, glossy piano black trim, and air vents without leaving a single scratch.
- Stiffer nylon brushes: Save these for the heavy-duty work. They're perfect for scrubbing floor mats or working a cleaning solution deep into stubborn carpet stains, lifting the grime right out of the fibers for the vacuum to grab.
To make those brushes effective, you'll need a quality all-purpose cleaner (APC). The key is to find a pH-neutral formula that's safe on the wide variety of materials you'll encounter, from plastic and vinyl to fabric. A good APC breaks down grime and lifts stains without bleaching or damaging surfaces. For a deeper dive into techniques, check out these pro car interior cleaning tips.
The secret to a factory-fresh interior isn't one magic product, but rather a system of tools that work together. A vacuum removes the loose debris, brushes agitate the stuck-on grime, and a safe cleaner dissolves it away.
Preventing Cross-Contamination
Finally, let's talk about one of the most important rules in detailing: keep your tools separate. The microfiber towels you used on your wheels or to buff wax off the paint are now loaded with brake dust, road grime, and chemical residue. Using those inside is a surefire way to scratch a screen or stain a door panel.
Make it a habit to have a dedicated set of microfiber towels just for interior work. This simple practice is a hallmark of professional detailing. It prevents you from dragging abrasive gunk from the outside into the clean space you just worked so hard to create. Maintaining this separation is a small step that makes a world of difference in the final result.
Protecting Your Paint for a Lasting Shine
You’ve done the hard work—the washing, the drying—and now you’re looking at a perfectly clean canvas. This next step is where the magic really happens. We’re going to lock in that shine and give your paint a durable layer of protection. Honestly, this is the most rewarding part of the whole process, because it makes all your effort last for weeks, sometimes even months.
When you're just starting out, paint protection can seem complicated, but it really boils down to two great options that are easy to use and give you amazing results. Think of it like this: are you looking for a deep, rich moisturizer that gives an incredible glow, or a high-tech shield that offers long-lasting defense? That’s the basic difference between a traditional wax and a modern sealant.
Choosing Your Protection: Wax vs. Sealant
First up is the classic carnauba wax. This stuff comes from a Brazilian palm tree and has been the go-to for car enthusiasts for decades. Why? Because nothing quite matches the deep, warm, wet-look gloss it gives your paint. If you're chasing that jaw-dropping, "just drove it off the showroom floor" shine, carnauba is your best friend.
- Best for: Anyone who loves a rich, deep glow and doesn't mind the therapeutic process of waxing their car every month or two.
- Application: Usually comes as a paste or liquid that you apply with a simple foam applicator pad.
Your other choice is a synthetic paint sealant. These are pure chemistry—polymers designed in a lab to create an incredibly tough and durable bond with your car's clear coat. A sealant might not have the same warm glow as a carnauba wax, but it more than makes up for it in sheer performance. It creates a super slick, glassy surface that makes water bead up and roll right off.
Key Takeaway: A good sealant is like armor for your paint, easily lasting 3 to 4 times longer than a typical carnauba wax. If you're a beginner who wants maximum protection with minimum fuss, a sealant is a fantastic place to start.
The Simple Application Process
Here's the great news: whether you go with a wax or a sealant, putting it on is basically the same simple process. You only need two key pieces of car detailing equipment for beginners to get it done right.
1. Foam Applicator Pads
These little foam discs are your secret weapon for a perfect application. They help you spread a super thin, even coat of product without wasting a drop. Applying too much wax or sealant is a classic rookie mistake that just makes it a nightmare to buff off. A small dab on the pad is all you need—then just work it into one panel at a time with light, overlapping circles.
2. High-Quality Microfiber Towels
Once the product dries to a light haze (always check the bottle for the recommended time), it’s time to buff it off. This is where a plush, clean microfiber towel is essential. Use one side of the towel to wipe away the bulk of the hazy residue, then flip it to a fresh, clean side for the final buff. This last step is what reveals that slick, glossy finish and leaves your paint protected from UV rays, bird bombs, and everyday road grime.
Building Your First Detailing Starter Kit
https://www.youtube.com/embed/f_Fv7ZWfrdU
Alright, now that you've got a handle on the key tools, let's translate that knowledge into a practical shopping list. The good news? You don't have to buy everything at once. Building your first car detailing starter kit is a marathon, not a sprint. Think of it as a tiered approach—start with the essentials that make the biggest difference and then add to your arsenal as your skills and passion grow.
It's a lot like how a budding photographer needs a solid best photography starter kit for beginners before they start collecting specialized lenses. You want to focus on the gear you'll use right away, not on advanced tools that will just collect dust. Let's break down how to get started.
The Essential Kit: The Bare Minimum
This is your ground floor, the absolute must-haves for doing the job safely and effectively. If your budget is tight, start here. These core items alone will launch your results lightyears ahead of a simple driveway wash and actually protect your car's finish in the process.
- Washing & Drying: Grab two 5-gallon buckets and two Grit Guards (this is non-negotiable for preventing scratches). Add a high-quality microfiber wash mitt and a big, plush microfiber drying towel.
- Interior Basics: You'll need a solid shop vacuum with a few different attachments, a good all-purpose cleaner (APC) that's safe for multiple surfaces, and a dedicated pack of microfiber towels just for the interior.
- Paint Protection: Pick your poison: either a traditional carnauba wax or a more modern synthetic paint sealant. Don't forget the foam applicator pads to apply it and a few clean microfiber towels for buffing it off.
It's tempting to grab one of those all-in-one kits from the auto parts store. They’re convenient, for sure. But, piecing these essentials together yourself usually means you get much higher-quality versions of the most critical items, like your wash mitts and drying towels.
While building your own kit gives you total control over quality, it's true that bundled solutions are popular. We've seen a steady rise in people searching for "car detailing kits," which shows how many newcomers just want a simple, one-box solution to get started. Still, my advice is to build your own foundation first.
For a deeper dive, you can check out our complete car detailing supplies list.
Common Questions We Hear from New Detailers
Diving into the world of car detailing can feel a bit overwhelming, and you're bound to have questions. It's totally normal. Let's walk through some of the most common things beginners ask so you can get started on the right foot.
"How often do I really need to do a full detail?" This is probably the number one question. The good news is, it's less often than you think. A full-on detail—we're talking clay bar, polish, and sealant—is only really necessary 2-3 times per year. The real key is regular upkeep. A proper, safe maintenance wash every 1-2 weeks will do wonders to keep your car looking sharp.
Do I Need to Buy Expensive Gear?
Another big one is about cost. Do you actually get what you pay for with those high-end, expensive products? Sometimes, yes. But you absolutely do not need to spend a fortune to get a fantastic-looking car.
Honestly, the secret isn't in the price tag; it's in your technique and using the right car detailing equipment for beginners. I've seen amazing results from affordable, over-the-counter products used correctly. A careful wash with a basic soap will always look better than a sloppy job with a premium, boutique brand.
Key Takeaway: Your skill is more important than your stuff. Focus on mastering the process first. A detailer with good technique and basic equipment will always get better results than someone with top-shelf gear and no idea how to use it.
So, what's the bare minimum to get started? You can get a professional-level clean with just the essentials: two buckets with two grit guards, a good wash mitt, a plush microfiber drying towel, a safe all-purpose cleaner, and a quality wax or sealant. That's your foundation for a safe and effective routine.
One last thing that often gets overlooked is how to care for your microfiber towels. It’s crucial. Always wash them by themselves, never with other laundry. Use a dedicated microfiber detergent and absolutely no fabric softener—it will clog the fibers and make them useless. Tumble dry on low heat or, even better, let them air dry. Do this, and they'll last you for years.
Ready to make washing your car faster, safer, and more fun? The SwiftJet Car Wash Foam Gun connects to any garden hose to blanket your vehicle in thick, dirt-lifting foam. It's the perfect tool to upgrade your detailing game. Get your SwiftJet foam gun today!