
When someone says they’re going to detail their car at home, they mean a lot more than just a quick wash. It’s about diving deep, restoring that head-turning shine, and protecting the car you love. It’s a process, for sure, but with the right gear and a good game plan, you can get results that rival the pros, all from your own driveway.
The Real Value of Detailing Your Own Car
Getting into DIY car detailing might seem like a big leap, but the rewards go way beyond just a sparkling clean car. Think of it as an investment—in your car’s lifespan, its looks, and honestly, your own sense of pride. It’s why so many car lovers are turning it into their favorite weekend project.
It's More Than Just a Chore
There’s something special about detailing your own car. You start to notice every line and curve, and you build a real connection with your machine while keeping it in perfect shape. It's a satisfying, hands-on job that leaves you with a real sense of accomplishment when you step back and see that gleaming finish.
This isn’t just some niche hobby anymore, either. It’s part of a bigger trend. The global car detailing market hit around $37.4 billion in 2024, mostly because people want to keep their cars looking great and protect their resale value. Now, those same people are realizing they can do it themselves. If you're curious, you can find more market insights over at Fortune Business Insights.
Here's the bottom line: Detailing isn't just cleaning. It's preventative maintenance for your car’s finish, shielding it from things like UV rays, bird droppings, and road grime that can cause permanent damage to your paint.
The Practical Perks of DIY Detailing
Beyond that feeling of a job well done, there are some very real, practical reasons to take this on yourself. The long-term benefits pile up fast, making it a smart move for any car owner.
Here's what you really gain:
- Serious Cost Savings: A single trip to a professional detailer can easily run you hundreds of dollars. By grabbing a solid starter kit with a high-performance foam gun like the SwiftJet, you can get those same results again and again for a tiny fraction of the price.
- Total Quality Control: Let's be honest, no one is going to care about your car as much as you do. When you detail your car at home, you're in charge of every single step. You can skip the harsh chemicals and abrasive brushes used at automatic car washes, which are notorious for leaving behind swirl marks and fine scratches.
- Protecting Your Investment: A car with a pristine finish holds its value way better than a neglected one. Consistent detailing keeps the paint looking new, protects the interior from fading or cracking, and makes a huge difference when it’s time to sell.
Ultimately, grabbing a foam gun and detailing your car yourself turns a weekend chore into something you can actually enjoy. It puts the power in your hands to get a jaw-dropping finish, save a good chunk of change, and keep your car looking incredible for years to come.
Building Your At-Home Detailing Arsenal
Getting that professional, showroom shine when you detail your car at home all starts with having the right gear. You don't need a garage full of every gadget imaginable, but investing in a few key pieces will make the entire process smoother, safer for your paint, and give you dramatically better results. It’s all about building a smart, effective toolkit.
This infographic gives you a great visual overview of what a solid at-home setup looks like.
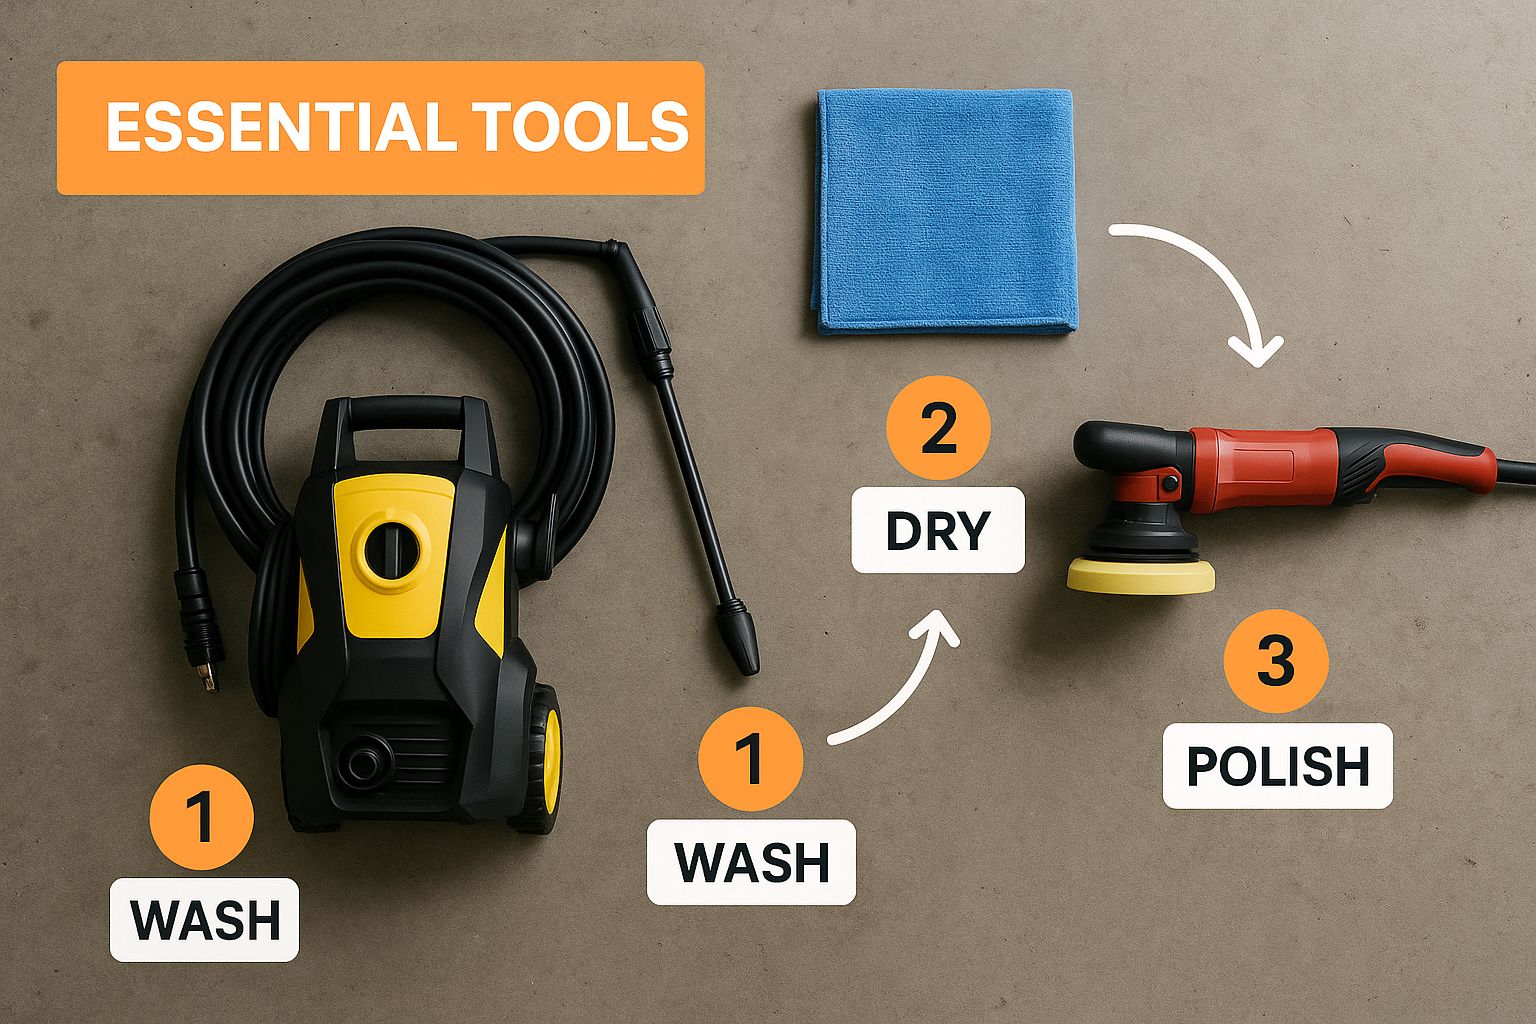
As you can tell, a great detail isn't about one magic product. It's about a system where each tool plays a specific, crucial role—from the first rinse to the final layer of protection.
Your Essential Detailing Gear Checklist
Before diving into the specifics, here's a quick-glance guide to the must-have items for your home detailing kit. Think of this as your core shopping list.
| Tool | What It Does | Key Feature to Look For |
|---|---|---|
| SwiftJet Foam Gun | Lifts dirt and grime before you touch the paint. | Connects to a standard garden hose—no pressure washer needed. |
| Two Wash Buckets | Separates clean, soapy water from dirty rinse water. | Look for buckets with Grit Guards at the bottom to trap dirt. |
| pH-Neutral Car Soap | Cleans effectively without stripping wax or sealants. | "pH-neutral" or "wax-safe" on the label. |
| Microfiber Wash Mitt | Gently washes the surface without causing scratches. | Deep, plush pile to trap dirt particles away from the paint. |
| Microfiber Towels | Used for drying, polishing, and interior cleaning. | A variety of GSM (grams per square meter) ratings for different jobs. |
| Clay Bar/Mitt | Removes embedded contaminants from the paint. | A fine-grade clay is a safe starting point for most vehicles. |
| Wax or Sealant | Protects the paint and adds a deep gloss. | Choose based on desired look (carnauba wax for warmth, sealant for durability). |
Having these items on hand means you’re ready to tackle a proper detail from start to finish, the right way.
The Foundation: Your Wash and Dry Gear
Believe it or not, the most common cause of swirl marks and fine scratches comes from a bad wash technique. Your first priority is getting gear that cleans your car without grinding grit into the clear coat. This is where a foam gun and the two-bucket method become absolute game-changers.
The SwiftJet foam gun is the heart of this system. It hooks right up to your garden hose and blankets your car in thick, clingy suds. This foam does the heavy lifting for you, lubricating the surface and loosening stubborn dirt, so most of it rinses away before you ever have to touch the paint with a mitt.
Alongside the foam gun, the classic two-bucket wash method is non-negotiable for safe washing:
- Bucket #1 is for your suds—your clean, soapy water.
- Bucket #2 is just for rinsing—filled with plain, clean water.
Here’s how it works: after you wash a single panel, you dunk your dirty mitt into the rinse bucket first, wringing it out to release all the grime. Only then do you dip it back into your soap bucket. This simple step keeps the dirt trapped in the rinse bucket, preventing you from dragging it all over your car's paint.
The Right Soaps and Towels Make All the Difference
Once your wash process is safe, you need the right liquids and applicators to do the job properly. Not all soaps are created equal, and using the wrong towel can instantly undo all your careful work.
A high-quality, pH-neutral car shampoo is a must. Unlike dish soap or other household cleaners, a dedicated car shampoo is formulated to cut through grime without stripping off your car’s wax or sealant. It cleans what you want gone and leaves the protection you want to keep.
Microfiber towels are another cornerstone. You'll quickly find you need a small collection for different tasks:
- Plush, high-GSM towels are perfect for drying. They’re super absorbent and won't scratch the paint.
- Waffle-weave towels are the secret to streak-free glass.
- General-purpose, lower-pile towels are great for wiping down interiors or buffing off wax residue.
This trend of using pro-level tools at home has exploded. As the mobile car detailing market races toward an expected $126.3 billion by 2025, more and more car enthusiasts are learning what the pros use and are investing in quality kits to get the same results themselves.
Taking It to the Next Level: Decontamination and Protection
To get that truly slick, glass-smooth finish, you have to decontaminate your paint. Over time, your car's clear coat gets clogged with tiny, bonded particles—things like industrial fallout, rail dust, and road tar—that a normal wash just won't remove.
A clay bar or a modern clay mitt is your tool for this. Paired with a clay lubricant, it glides across the paint and gently plucks these embedded bits out of the clear coat. The difference in smoothness after claying is something you have to feel to believe.
Finally, after all that hard work, you have to protect your paint. A good wax or sealant acts as a sacrificial barrier, shielding your car’s finish from UV rays, bird droppings, and road grime. It’s what delivers that deep, wet-looking gloss and makes your next wash significantly easier.
Building out a complete toolkit can be a gradual process, but starting with these fundamentals will set you up for success. For a more detailed breakdown, our comprehensive https://www.swiftjetusa.com/blogs/news/auto-detailing-checklist has everything you could possibly need. And for those who get really serious about the craft, creating a dedicated workspace like a [metal building home shop] can make all the difference in your results and enjoyment.
The Exterior Detailing Workflow From Start to Finish
Alright, all that prep work is done. Now for the fun part—the actual transformation. If you want to detail your car at home and get professional results, you need a game plan. Following the right order of operations isn't just about being efficient; it's about preventing simple mistakes that create more work, like slinging brake dust all over a freshly washed door panel.
We're going to walk through this exactly how a pro would do it, starting with the filthiest parts first and finishing with a slick, protected surface that gleams.
Always Start With Wheels and Tires
This might feel backwards, but trust me on this: always start with the wheels and tires. Why? They’re covered in the worst grime imaginable—caked-on brake dust, road tar, and all sorts of nasty stuff.
If you wash the body first, the moment you hit those wheels with a brush, you’ll splatter black gunk onto your clean paint. That means re-washing panels and wasting your time and soap. Knocking out the wheels first keeps the mess contained right from the get-go.
Grab a dedicated wheel cleaner that’s safe for your specific wheel finish, along with a few brushes to get into the barrels and between the spokes. Critically, use a completely separate bucket and wash mitt for this job. You do not want the abrasive grit from your brakes anywhere near your car's clear coat.
The Pre-Wash Foam Bath
With the wheels handled, it's time for the single most important step in preventing swirl marks: the pre-wash. This is where your SwiftJet foam gun truly shines. Before a wash mitt ever makes contact with your paint, the goal is to get as much loose dirt off as possible without touching it.
Hook up the SwiftJet to your garden hose and give the entire car a thick blanket of snow foam. You’re not scrubbing here; you're letting the foam do the heavy lifting. The suds will cling to the surface, breaking down grime and encapsulating dirt particles, gently pulling them away from the paint.
Let the foam dwell for a few minutes, but never let it dry on the surface, especially if you're in the sun. Once it’s worked its magic, give the car a thorough rinse from the top down. You’ll be shocked at how much dirt just slides right off before you’ve even started the main wash.
Pro Tip: Rinsing from the top down uses gravity to your advantage. It pulls all the soap and loosened grime down and off the car, ensuring you don't rinse dirty water over an area you just cleaned.
The Two-Bucket Hand Wash
Now that the major grit is gone, we can move on to a safe contact wash. This is where the two-bucket method is non-negotiable for anyone serious about protecting their paint. It’s a simple concept that makes a huge difference.
Here’s the rhythm: dip your clean microfiber wash mitt into the soap bucket, wash a single panel (start with the roof, then the hood), and then dunk that dirty mitt into the plain water rinse bucket. Agitate it against the grit guard to release all the grime you just picked up. Only then does your mitt go back into the soap bucket for the next panel.
This process ensures you’re only ever touching your paint with a clean, well-lubricated mitt. For a deep dive into this crucial technique, check out our guide on the two-bucket wash method.
Decontaminating the Paint for a Smooth Finish
Your car may look clean after a wash, but run your hand over the paint (inside a plastic baggie for extra sensitivity). Feel that gritty texture? Those are bonded contaminants—tiny bits of industrial fallout, rail dust, and tar—that washing alone won't remove. Getting rid of them is the key to a truly glass-smooth surface where waxes and sealants can properly bond.
Decontamination is a two-phase attack:
- Chemical Decontamination: An iron remover spray is your first weapon. These formulas react with the tiny iron particles embedded in your clear coat. You'll see them dissolve and "bleed" a dramatic purple color. Just spray it on, let it react for a few minutes, and rinse it away thoroughly.
- Mechanical Decontamination: Next up is a clay bar or a clay mitt. Using a dedicated clay lubricant to create a slick surface, you'll glide the clay over each panel in straight-line motions. You can literally feel the roughness disappear as the clay pulls the remaining embedded gunk out of the paint.
You don't need to do a full decontamination with every wash—just a couple of times a year. It’s a step that separates a good-looking car from a professionally detailed one when you detail your car at home.
Proper Drying to Prevent Water Spots
You're in the home stretch, but don't drop the ball on drying. Letting a car air-dry is the fastest way to cover it in water spots, especially if you have hard water. These mineral deposits can etch into your clear coat and become a real pain to remove.
The best approach is to use a large, plush microfiber drying towel. Instead of rubbing and scrubbing, which can introduce fine scratches, use a safer method. Either lay the towel flat over a section and gently pat it (the "blotting" method) or lay it down and slowly drag it towards you, letting its absorbency do all the work.
This technique minimizes friction and protects the finish you've worked so hard to clean. For a truly flawless, spot-free result, advanced detailers often use a deionized water system for their final rinse. It filters out all the minerals, so the water evaporates completely clean, leaving zero residue behind.
With the car perfectly dry, you now have a pristine canvas, fully prepped and ready for the final layers of protection.
A truly killer detail isn't just about a mirror-finish on the outside. Let's be honest, the interior is where you actually spend your time. Getting that space feeling fresh, clean, and genuinely nice to be in is half the battle when you detail your car at home.
So, we're shifting our focus from paint and chrome to plastics, leather, and glass. It's time to get that new-car feeling back.

This is more than just a quick wipe-down. We're going to systematically tackle every nook and cranny to create a space that feels as incredible as it looks.
Start with a Deep Declutter and Vacuum
Before a single drop of cleaner comes out, you've got to clear the decks. Pull everything out that doesn't belong—floor mats, that stack of receipts in the door pocket, the junk in the center console. You need a clean canvas to really see what you're working with.
Once everything's out, it's time to get serious with the vacuum. A good shop vac with a few different attachments is your best weapon here. Don't just give the carpets a quick pass; you need to be methodical.
- Seat Rails: Slide the seats all the way forward, then all the way back. You'll be amazed at the junk that collects in those rails.
- Crevices: That skinny crevice tool is perfect for getting deep between the cushions and alongside the center console where everything seems to disappear.
- Pedals: It's an often-missed spot, but a ton of dirt and grit builds up around the pedals. Get in there and get it out.
- Vents: Use a soft-bristled brush to gently agitate the dust in your air vents, then immediately vacuum it up before it settles somewhere else.
A proper vacuum job isn't a five-minute task. It can take a while, but I'd argue it's the single most impactful part of any interior detail.
Cleaning and Protecting Every Surface
With all the loose crud gone, we can move on to the deep clean. A classic rookie mistake is grabbing one "all-purpose" cleaner and blasting everything with it. Your car's interior is a mix of materials—vinyl, plastic, leather, fabric—and they all need their own approach.
For your dashboard, door panels, and other plastic trim, stick with a dedicated interior cleaner. These are designed to lift grime and body oils without leaving behind a greasy film that just attracts more dust. A key pro tip: spray the cleaner onto your microfiber towel, not the dash itself. This prevents overspray from getting all over your freshly cleaned windows.
Key Takeaway: After cleaning plastic and vinyl, always follow up with a quality UV protectant. This step does more than just add a nice, low-sheen factory finish; it nourishes the material and, crucially, protects it from the brutal sun damage that leads to cracking and fading.
For fabric seats and carpets, you'll need an upholstery cleaner and a decent brush. Work in small, manageable sections. Spray the cleaner, work it into a lather with the brush to lift the stain, and then blot the area with a clean, dry microfiber towel to pull out the dirt and the solution.
If you really want to get these techniques dialed in, our guide on 7 pro car interior cleaning tips goes even deeper into getting those professional-level results.
Address the Often-Forgotten Details
The real difference between a "clean car" and a "detailed car" is in the little things. It’s these forgotten spots that take your work to the next level and really nail that showroom vibe.
Forgotten Area Checklist
| Area to Clean | Why It Matters | Pro Tip for Cleaning |
|---|---|---|
| Door Jambs | They get surprisingly filthy but are on full display every time you open a door. | A quick detailer spray and a dedicated microfiber towel will have them shining. |
| Pedals | Grimy pedals just look sloppy and can even get a bit slick. | Scrub them with an all-purpose cleaner and a stiff-bristled brush. |
| Seat Belts | Think about it—they soak up oils and dirt from your hands and clothes constantly. | Pull the belt all the way out, clamp it, and gently scrub with a mild interior cleaner. |
| Steering Wheel | This is the highest-touch surface in your car, covered in oils and germs. | Give it a thorough cleaning, paying close attention to the stitching where gunk hides. |
Spending just a few extra minutes on these areas makes a massive difference. It signals a level of care that separates a quick tidy-up from a proper job when you detail your car at home.
Achieving That Perfect Streak-Free Glass
Alright, the last step: interior glass. This is where so many people get frustrated with streaks and haze. The secret isn't just the product; it's the technique.
First off, only use an automotive-specific glass cleaner. Household stuff like Windex often contains ammonia, which can destroy your window tint and damage dash plastics over time. The real key, though, is the two-towel method.
- The Cleaning Towel: Take your first microfiber towel, give it a light mist of glass cleaner, and wipe down the entire window. Your goal here is to break up and remove all the film and grime.
- The Buffing Towel: Immediately grab a second, bone-dry microfiber towel (a waffle-weave towel is fantastic for this) and buff the glass until it's perfectly clear and streak-free.
This simple process works every time because you're removing both the dirt and any leftover cleaner residue. The result? Nothing but crystal-clear glass.
How to Protect Your Paint for a Lasting Shine
You’ve done the heavy lifting. The wheels are spotless, the paint is clean and smooth, and the interior feels brand new. Now comes the final, most satisfying step: laying down a layer of protection to lock in all that hard work and make your car shine for weeks to come.
This final stage is what truly separates a simple wash from a proper detail.
Wax vs. Sealant vs. Ceramic: Choosing Your Armor
Picking the right protection can feel a bit overwhelming with so many options out there. I'm going to break down the three main players you'll encounter when you detail your car at home: traditional carnauba waxes, modern synthetic sealants, and the newer, super user-friendly ceramic sprays.
Each has its own unique personality and strengths. The best choice for you really just boils down to your goals for the car.
| Protection Type | Primary Benefit | Typical Durability | Best For |
|---|---|---|---|
| Carnauba Wax | Deep, warm, wet-look shine | 4-6 weeks | Car show enthusiasts who want maximum visual depth. |
| Synthetic Sealant | Slickness and long-lasting protection | 4-6 months | The daily driver who needs reliable, all-weather defense. |
| Ceramic Spray | Extreme water beading and ease of use | 6-12 months | Anyone looking for long-term protection without complex application. |
As you can see, there's a clear trade-off. Are you chasing that warm, liquid glow of a classic wax for a weekend show, or do you need tough, set-it-and-forget-it protection for your daily commute? Your answer points you to the right product.
Applying Your Chosen Protection for a Flawless Finish
Here’s the biggest mistake I see beginners make: they slather the product on way too thick. More is not better. A thick layer doesn't add more protection; it just makes the product a nightmare to buff off and leaves you with ugly streaks and hazing. Thin and even is always the goal.
No matter which product you land on, the prep work is identical. You always want to work on a cool, clean, and dry surface, preferably out of direct sunlight. A hot panel will cause the product to flash and dry too quickly, making it difficult to apply correctly.
Working with Carnauba Wax
- Start by dabbing a small amount of wax onto a foam applicator pad.
- Gently spread it over a small section at a time—think half a door panel or a quarter of the hood—using thin, overlapping motions.
- Let it haze over. This usually just takes a few minutes, but always check the product's instructions.
- Gently buff away the residue with a clean, plush microfiber towel. Be sure to flip your towel to a clean side often.
Using Synthetic Sealants and Ceramic Sprays
This is where things get even easier. Most modern formulas are a simple "spray on, wipe off" process. You'll lightly mist a panel, spread the product evenly with one microfiber towel, and then immediately follow with a second, dry microfiber to buff it to a brilliant shine.
Crucial Tip: The two-towel method is your secret weapon for a streak-free finish with spray sealants and ceramics. Dedicate one towel for spreading and a separate, completely dry towel for the final buff. This prevents you from just smearing a wet product around.
Keeping That Shine Alive Between Details
You've put in the work, but a little maintenance goes a long way. The key to making your protective layer last is washing your car regularly—every week or two is ideal—using a pH-neutral shampoo and the safe two-bucket method we covered earlier. Using harsh, cheap soaps is the fastest way to strip that wax or sealant you just applied.
For quick touch-ups between washes, a quality quick detailer spray is an absolute must-have. It’s perfect for safely zapping light dust, fingerprints, or bird droppings before they get a chance to etch into your clear coat. It also works brilliantly as a drying aid after a wash, adding lubrication to prevent scratches and giving the gloss a nice little boost.
Think of it as a mini-detail in a bottle. It helps extend the life of your base layer of protection and keeps that "just-detailed" look alive and well.
Your Car Detailing Questions, Answered
Alright, even with the best tools and a solid game plan, you're bound to have questions when you first start detailing your own car. It's totally normal. Let's run through some of the most common ones I hear, so you can tackle your next detail with a lot more confidence.
How Often Do I Really Need to Detail My Car?
This is probably the number one question, and there's no single magic number. It really breaks down into two different jobs: the deep detail and the regular maintenance wash.
A full-blown detail—we’re talking clay bar, polish, the whole nine yards—is something you'll want to do about 2-4 times per year. A great way to think about it is seasonally. Prepping your car for the winter salt or the summer sun is a smart move.
But the maintenance wash? That’s a different beast entirely. You should be doing a safe wash every 1-2 weeks. This quick clean-up stops road grime, bird droppings, and dust from building up and potentially damaging your paint. Plus, it makes those big seasonal details way, way easier.
Can I Just Use Dish Soap? Is it Really That Bad?
I'm going to be blunt: yes, it’s that bad. Using dish soap is one of the most common—and most damaging—mistakes I see people make. Sure, it’s great at cutting through the grease on last night’s lasagna pan, but that's exactly why it's a nightmare for your car.
Dish soap is designed to strip everything away, and that includes any wax, sealant, or ceramic coating you’ve painstakingly applied. It leaves your car's clear coat completely naked and vulnerable to UV rays, acid rain, and everything else the world throws at it. Always, always use a dedicated, pH-neutral car shampoo.
Polishing vs. Waxing: What's the Actual Difference?
It’s super easy to confuse these two, but they do completely opposite jobs. Here’s the simplest way to remember it: polishing corrects, waxing protects.
-
Polishing is an abrasive step. It uses tiny particles to carefully shave down an almost microscopic layer of the clear coat. This is what removes swirl marks, light scratches, and that dull, hazy look from oxidation. It’s all about restoring the gloss by creating a perfectly flat, reflective surface.
-
Waxing is a non-abrasive step. A wax or sealant adds a brand-new layer on top of your paint. It doesn't fix a single scratch, but it's what gives you that deep, wet shine and creates a barrier that shields your paint from the elements.
So, you polish first to make the paint look perfect, then you wax to keep it looking that way.
Is a Foam Gun Actually Necessary?
Look, you can wash a car with a bucket and a mitt, no question. But if you're serious about preventing scratches and getting that professional result, a foam gun is a game-changer. It’s less about cleaning and more about safe cleaning.
When you use a foam gun like the SwiftJet, you're covering the car in a thick layer of suds that immediately starts to break down and lift away the heavy grit and dirt. This "pre-wash" step does the heavy lifting before your wash mitt ever touches the paint.
Think about it: you're pulling all those sharp, abrasive particles off the car with foam and water pressure, not dragging them across the finish with your mitt. That single step is the best defense you have against causing swirl marks. It's a small investment that protects the value and look of your vehicle in a big way.
Ready to stop washing your car and start detailing it? Saying goodbye to swirl marks begins with a better process, and the SwiftJet Foam Gun is your key. It hooks up to a standard garden hose and gives you that thick, clingy foam you need for a truly safe wash.
[Discover the SwiftJet Foam Gun today at https://swiftjetusa.com and get that showroom shine you've been searching for!]