
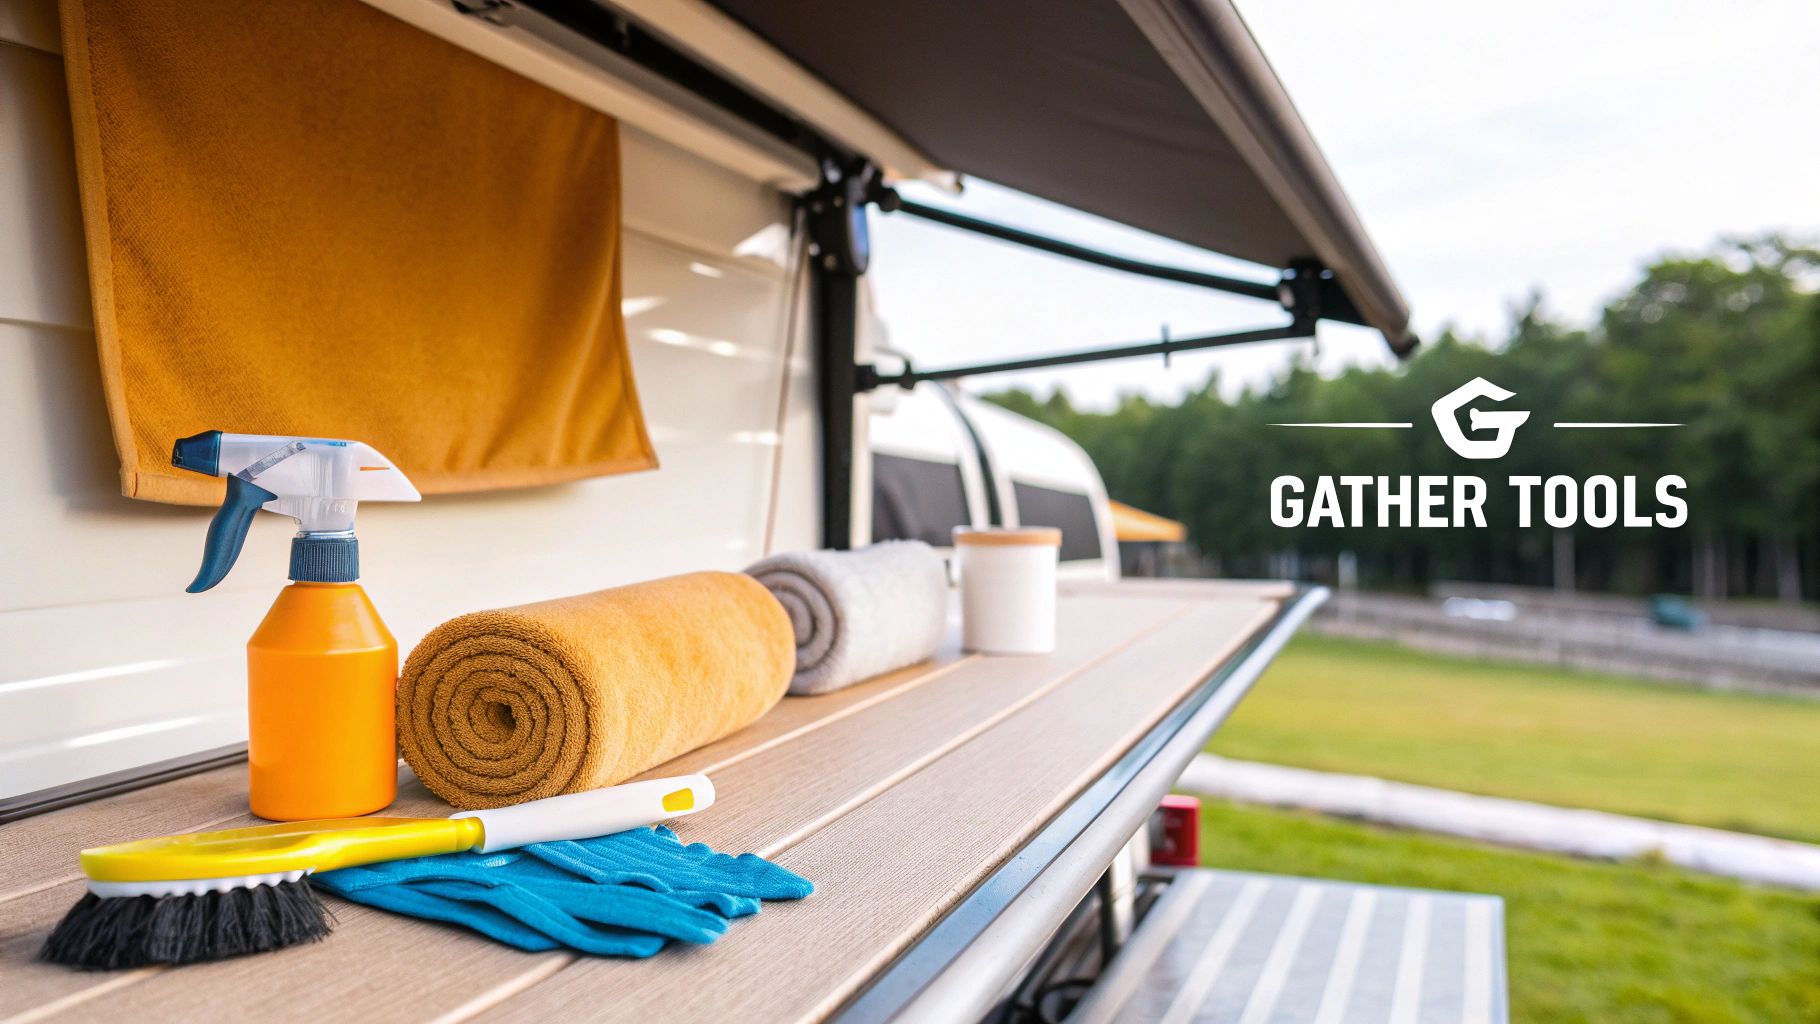
Before you even touch that awning, getting your supplies in order is half the battle. A little bit of prep work with the right gear can turn what seems like a big chore into a surprisingly simple task. You'll want to grab a soft-bristle brush, a bucket with a mild cleaning solution, and a garden hose.
Preparing for a Flawless Awning Clean
I've learned this the hard way: a great cleaning job is 90% preparation. If you just rush in with a random brush and whatever soap you find, you risk damaging the fabric or leaving a sticky residue that just attracts more grime. Taking ten minutes to get set up first will make the whole process smoother and safer.
Think of it like getting ready to paint a room. You wouldn't just start slapping paint on the walls, right? You'd lay down drop cloths and tape the edges. The same logic applies here. Having everything you need within arm's reach means you won't be scrambling mid-wash.
Assembling Your Cleaning Toolkit
The material of your awning—usually vinyl or acrylic—will guide some of your choices, but a few items are essential no matter what you're working with.
Here’s a quick checklist of what I always have on hand:
- A Soft-Bristle Brush: This is absolutely your most important tool. Anything stiffer can easily scratch a vinyl awning's protective coating or snag the fibers on an acrylic one, causing damage that you can't undo. Do yourself a favor and get one with an extension pole to avoid balancing precariously on a ladder.
- Gentle Cleaning Solution: For most routine washes, a simple bucket of warm water with a squirt of mild dish soap does the trick. If you're dealing with stubborn, set-in dirt, investing in a commercial RV awning cleaner is definitely worth it.
- Garden Hose with a Spray Nozzle: You’ll need a solid water source for rinsing. Stay far, far away from pressure washers—they have enough force to literally shred your awning fabric in the blink of an eye.
- Sturdy Ladder: While an extension pole is great, you’ll probably still need a good ladder to get a closer look at the awning and work on any particularly tough spots safely.
The Critical Spot Test
Here’s a pro tip that has saved me more than once: always perform a spot test. Before you go slathering a new cleaner all over the place, find a small, hidden area to test it on first—the underside near the RV wall is usually a good spot. Apply the cleaner, let it sit for a few minutes, then rinse it off and let it dry completely.
This quick check ensures the cleaner won't cause any weird discoloration or damage. Honestly, this five-minute test can prevent a very expensive mistake and is the single most important thing to do before you start.
As you're getting your RV ready, it’s a good time to think about other maintenance, too. A clean water supply is crucial for any trip, which might mean looking into services for professional water tank cleaning for caravans. For a more detailed guide on keeping your whole rig looking its best, you can find great tips here: https://www.swiftjetusa.com/blogs/news/how-to-wash-rv-like-a-pro-your-complete-maintenance-guide. Taking care of the whole package keeps your RV in prime condition for years of adventure.
The Awning Cleaning Process: A Step-by-Step Breakdown
Alright, this is where the magic happens, and it's a lot easier than you might imagine. The real secret to a sparkling clean awning isn’t about brute force or scrubbing until your arms ache. It's about working smart and letting your cleaning solution do the heavy lifting for you.
First things first, roll that awning all the way out. Before you even think about soap, give the entire surface a good rinse with a garden hose. You’re just looking to knock off the easy stuff—loose leaves, dust, and any spiderwebs that have moved in. This pre-rinse is crucial because it stops you from grinding that grit into the fabric when you start scrubbing.
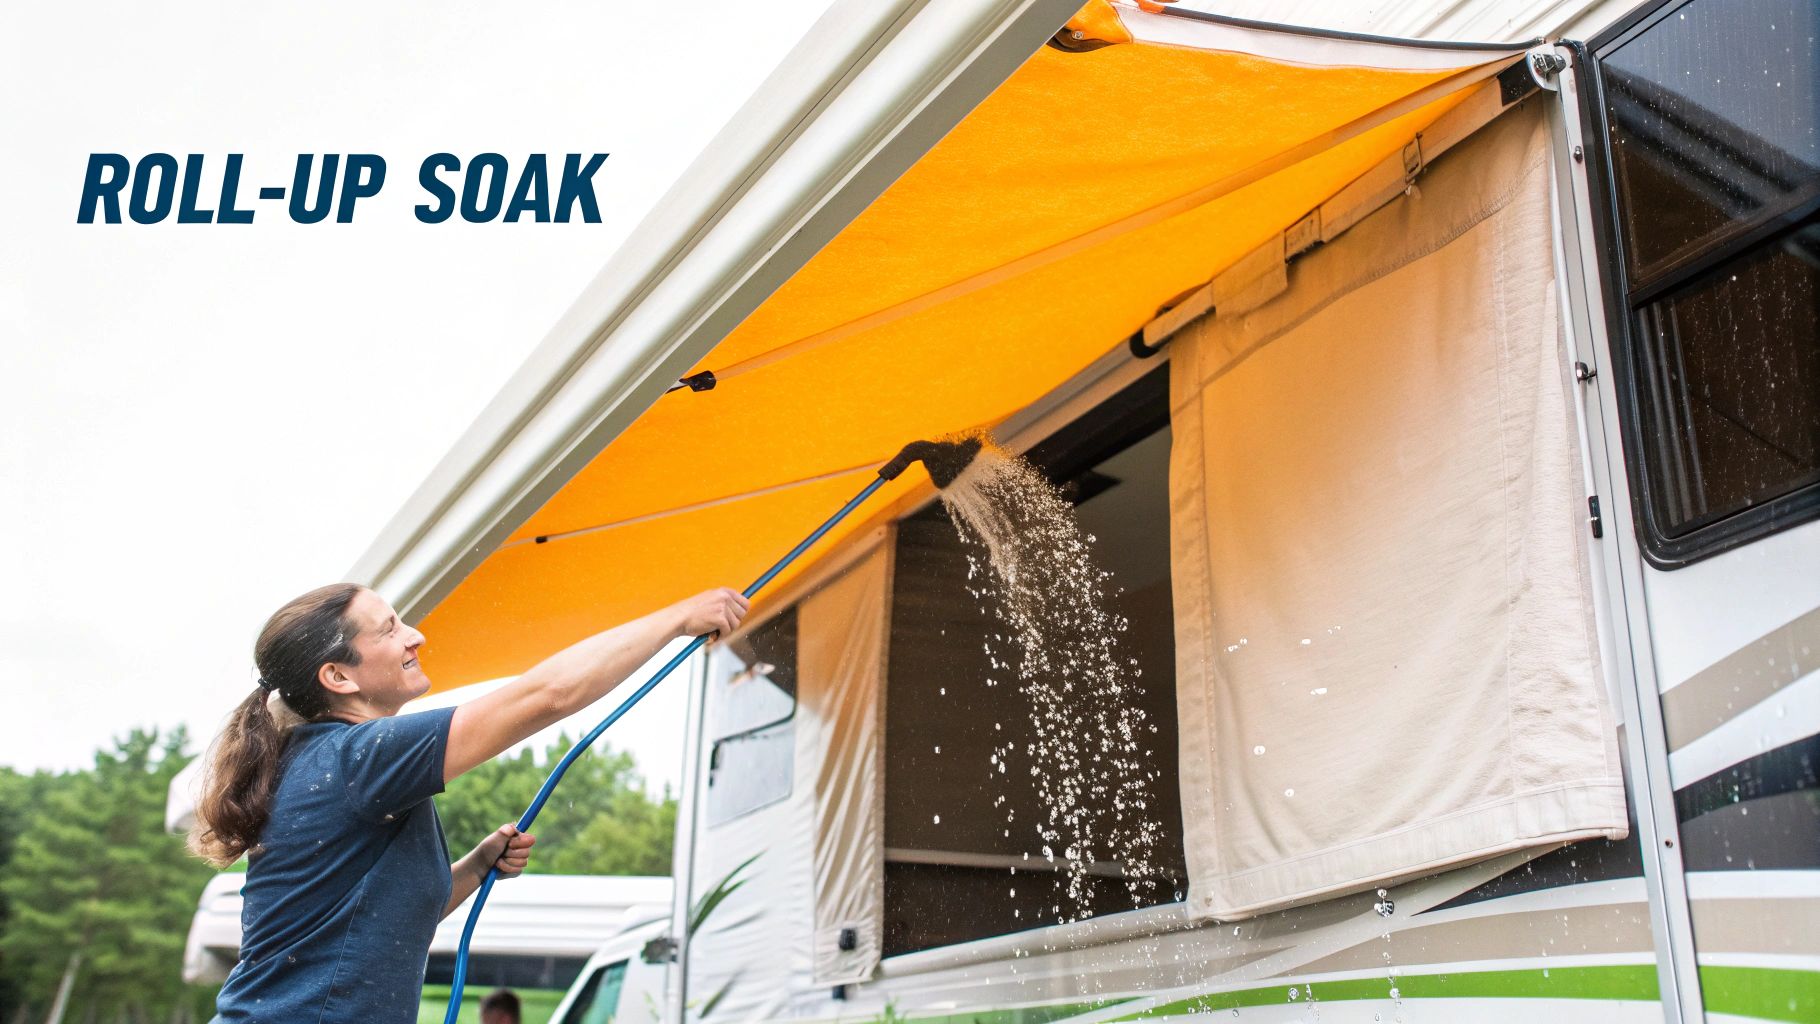
Apply the Cleaner and Do the "Roll-Up Soak"
With the awning damp, it’s time to bring in your cleaner. Whether you're using a store-bought formula or a simple mix of soap and water, get it on there generously. Make sure you cover both the top and the underside of the fabric. I use a soft-bristle brush on an extension pole to spread the solution evenly and work it into the material.
Now for the most important trick I've learned over the years: the 'roll-up soak.' Once the awning is completely coated in your cleaning solution, go ahead and retract it fully. Just let it sit there, rolled up, for about five to ten minutes.
This one small step makes a world of difference. When the awning is rolled up, it forces the cleaner to saturate both sides of the fabric at the same time. This process dissolves grime, breaks down stubborn pollen, and attacks mildew spores in places you can't even reach with a brush. It is, without a doubt, the key to a truly deep clean.
While I often recommend a good commercial cleaner for tough jobs, a DIY solution works wonders for regular maintenance. If you're wondering how to clean RV awnings with a homemade solution, it’s simple: mix about a 1/4 cup of mild dish soap into a 5-gallon bucket of warm water. Apply it, do the five-minute roll-up soak, and you're ready to go. You can find some more great tips on this method over on Lippert's blog.
The Scrub and Rinse
After letting it soak, extend the awning again. You should immediately notice that a lot of the dirt and grime has already loosened up. Grab your soft brush and gently scrub the entire surface. Think light, circular motions—let the bristles do the work, not your muscles. The goal is to lift the dirt, not wear out the fabric.
Be sure to give a little extra attention to any stubborn spots or areas where mildew was starting to form. This gentle but targeted approach ensures you get an even finish without damaging the awning material.
Once you’re done scrubbing, it's time for the final rinse. Don’t cut corners here. Start at the highest point of the awning and rinse downwards until every bit of soap is gone. Leaving soap residue behind is a rookie mistake; it creates a sticky film that actually attracts more dirt later on. Keep rinsing until the water running off the fabric is perfectly clear.
The Most Important Final Step: Air Drying
I can't stress this enough: you have to let the awning air dry completely before rolling it back up. Storing an awning that's even slightly damp is a guaranteed way to cultivate a new batch of mold, mildew, and that funky musty smell nobody wants at their campsite.
Leave it fully extended in the sun until it's bone dry to the touch on both the top and bottom. A little patience at this stage is the best preventative maintenance you can do, ensuring your awning stays fresh and ready for your next trip.
Removing Tough Stains, Mold, and Mildew
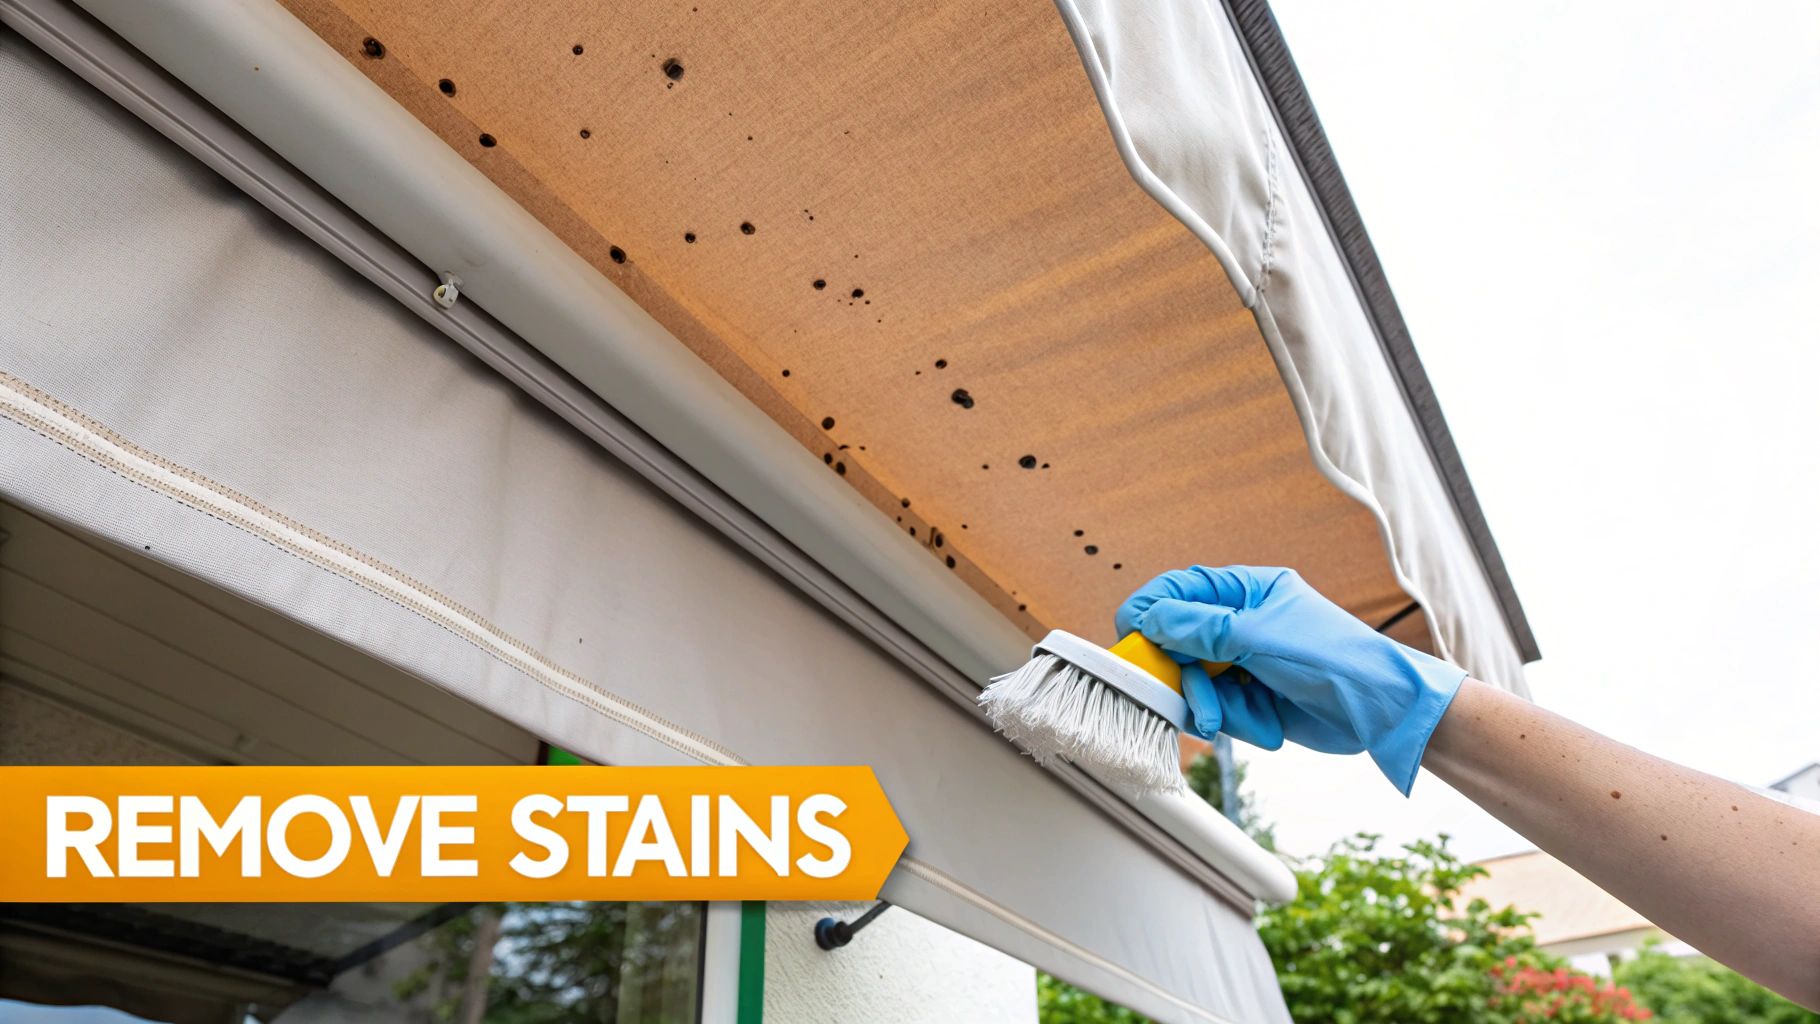
Even if you're diligent with routine cleaning, some stains just won't give up. We've all been there—facing down those stubborn black mildew spots, sticky tree sap, or bird droppings that have baked solid in the sun. These are the common frustrations of RV life, and they call for a more focused attack than your standard wash-down.
This is exactly where a lot of RVers go wrong. The immediate temptation is to grab the strongest chemical cleaner under the sink, but that’s often a recipe for disaster. Harsh chemicals can strip the protective coatings right off your awning fabric, causing more damage than the original stain. The real secret is to match the right treatment to the right stain, always starting with the gentlest option that gets the job done.
Tackling Mold and Mildew Growth
Those ugly black or greenish specks are the classic calling card of mildew. This pesky fungus loves damp, dark places, so if you've ever had to roll up your awning while it was still wet, you basically sent mildew a dinner invitation.
For a mild to moderate outbreak, you can mix up a surprisingly powerful, yet fabric-safe, cleaning paste right at your campsite.
- Mix Your Paste: Grab a small bowl and stir together equal parts white vinegar and baking soda. It will bubble up at first—that's normal. Just wait for the fizzing to die down until you have a thick paste.
- Apply It Liberally: Using a soft-bristled brush or a sponge, spread the paste directly onto the mildew spots. Don't be shy; you want to completely cover the affected areas.
- Let It Dwell: Give the paste about 15-20 minutes to work its magic. During this time, the vinegar is busy killing the mildew spores while the baking soda helps lift the stain from the fabric.
- Scrub and Rinse: After it has sat, gently scrub the area in small circles with your brush. Finish by rinsing everything away completely with clean water.
This simple DIY method is incredibly effective and far kinder to your awning than most aggressive chemicals. Don't forget that mildew often starts on the RV roof and drips down. Keeping your roof clean is one of the best ways to prevent awning stains in the first place. You can find a complete guide on how to clean an RV roof to protect your entire setup.
DIY vs Commercial Awning Cleaners
Choosing between a homemade solution and a store-bought product can be tough. Your decision really depends on the type of stain you're dealing with and whether you also want to add protective benefits. Here’s a quick breakdown to help you decide.
| Cleaning Need | DIY Solution (Pros & Cons) | Commercial Product (Pros & Cons) |
|---|---|---|
| General Washing | Dish Soap & Water: Inexpensive, readily available, and gentle. However, it offers no UV protection or mildew resistance. | Dedicated Awning Wash: Formulated to be fabric-safe and often includes UV inhibitors. Can be more expensive. |
| Mild Mildew | Vinegar & Baking Soda Paste: Highly effective, non-toxic, and cheap. It can be a bit messy to apply and requires dwell time. | Mold & Mildew Remover: Specifically designed to kill spores and lift stains. Some can be harsh, so check for fabric compatibility. |
| Tough Stains | Diluted Bleach (Last Resort): Powerful on stubborn mildew, but very risky. Can easily discolor or weaken fabric if not diluted properly. | All-in-One Cleaner & Protectant: Removes tough grime while adding a layer of water repellency and UV protection. The most convenient but also the priciest option. |
Ultimately, DIY solutions are fantastic for regular maintenance and mild issues. But for deep cleaning or to add a layer of long-term protection against the elements, a specialized commercial product is often the smarter investment.
When to Bring Out the Stronger Stuff
There are times when mildew is so embedded that the vinegar paste just can't cut it. For these severe cases, a highly diluted bleach solution is a last-resort option, but you have to proceed with extreme caution. We’re talking a very specific ratio of 1/4 cup of bleach to every 5 gallons of water. Any stronger, and you risk discoloring your fabric or destroying its water-repellent coating for good.
A much safer bet is to use a commercial awning cleaner formulated specifically to kill mildew. The big advantage here is that many of these products also contain UV protectants. They don't just clean; they add a shield to guard your awning against the sun, which is the number one cause of fabric degradation over time.
Expert Tip: Fighting with sticky tree sap? Stop scrubbing! That just smears it around. Instead, soak a small cloth in rubbing alcohol or a citrus-based cleaner and dab it onto the sap. Let it sit for a minute to dissolve the resin, then gently blot it away. Once the sap is gone, you can clean the spot normally.
Proactive Care to Prevent Awning Damage
The best way to keep your RV awning clean is to stop it from getting dirty in the first place. If you can shift your thinking from reacting to messes to proactively caring for the fabric, you'll save yourself hours of scrubbing and add years to your awning's life. It really just comes down to building a few simple habits that become second nature.
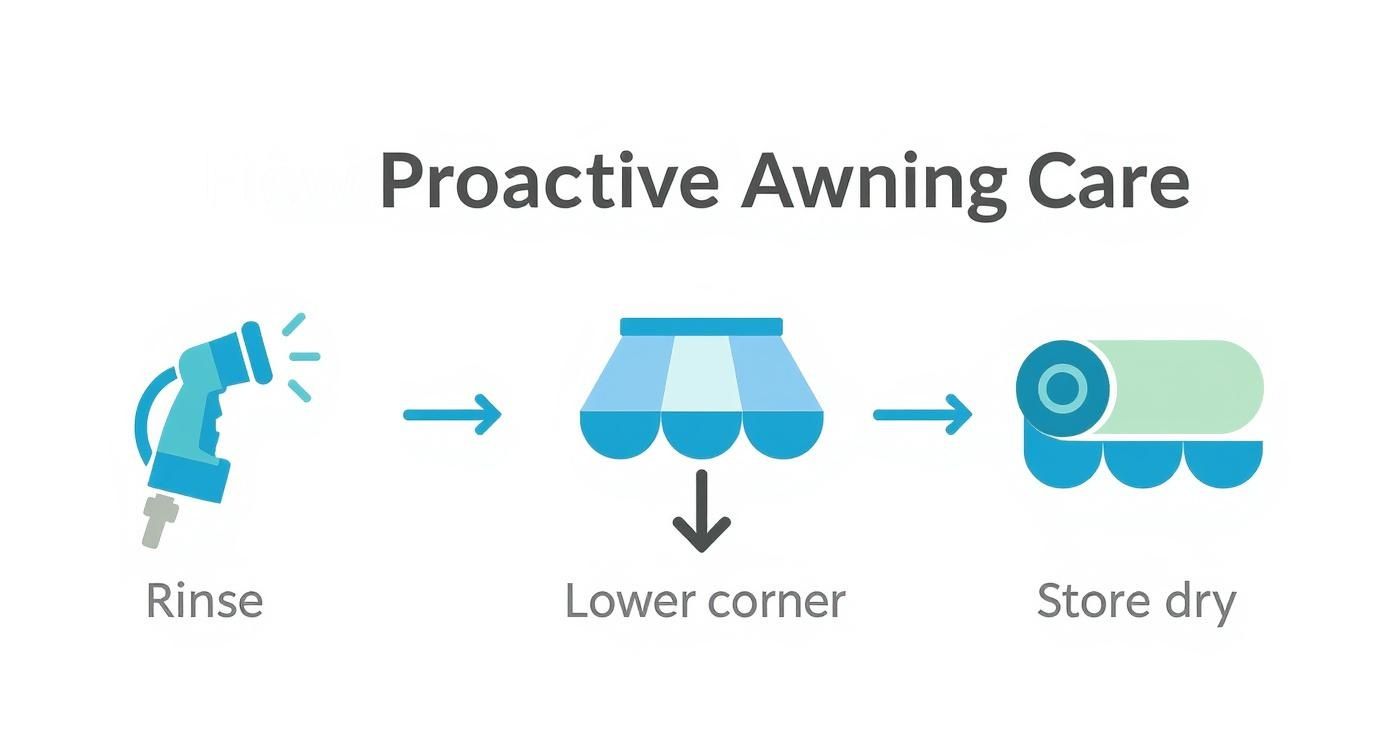
This isn't about some complicated, time-sucking routine. We're talking about small, consistent actions that make all the difference. For example, after camping in a dusty spot or under a bunch of trees, give the awning a quick rinse with a hose before rolling it up. That five-minute job prevents a layer of grime from getting baked in and is a whole lot easier than dealing with it weeks later.
Establish a Smart Maintenance Rhythm
A realistic maintenance schedule is the foundation of good awning care. That quick rinse is great for tidying up after a trip, but you'll still need a more thorough wash every so often to tackle the buildup of pollen, road grime, and general gunk.
Here’s a practical rhythm that works for most RVers I know:
- After Each Trip: Do a quick visual check. Brush off any leaves, twigs, or loose debris. If you see any bird droppings, spot-clean them right away before they have a chance to stain.
- During Rainy Weather: Always lower one corner of your awning a bit. This creates a slope for water to run off instead of pooling in the middle, which can stretch and permanently damage the fabric.
- Every Few Months: This is when you schedule a full, deep wash. This is the clean that gets rid of the grime that inevitably builds up over time and is absolutely essential for stopping mold and mildew in their tracks.
Regular maintenance is your best defense against mold. Most experts recommend a deep cleaning every three months, especially if you're a full-timer, to keep the fabric in top shape. Following this routine makes it far less likely you'll face a premature (and expensive) fabric replacement.
Best Practices for Long-Term Storage
How you put your awning away is just as important as how you clean it. The absolute number one rule is to never, ever store it wet. When you roll up an awning with even a little bit of moisture trapped inside, you’re creating the perfect dark, damp environment for musty smells and aggressive mildew to take over.
Always make sure your awning is bone-dry before you retract it, whether it's just for the night or for the entire season. If a sudden storm forces you to roll it up wet, make it your top priority to unroll it and let it dry completely at the very next opportunity.
Even with the best proactive care, parts can wear out over time. When that happens, you'll need a good resource for finding what you need. This guide to RV awning replacement parts is incredibly helpful for identifying and sourcing what you need to make a repair. Sticking to these simple routines will keep your awning clean, dry, and ready for whatever adventure comes next.
Cleaning Vinyl Vs Acrylic Awning Fabrics
Choosing the wrong cleaner for your RV awning can lead to irreversible harm. Vinyl and acrylic fabrics aren’t interchangeable—they react differently to soap, brushes, and sealants. Get this right, and you’ll keep your awning looking crisp season after season.
Think of vinyl as coated like your car’s paint: waterproof and UV-resistant, but easily nicked by harsh chemicals or stiff bristles. Acrylic feels more like a canvas tent—its fibers are dyed through and treated to shed water, yet still “breathe” to prevent moisture buildup.
Caring For Your Vinyl Awning
Protect that topcoat. Tiny scratches mean trapped dirt and mildew down the road.
- Use a soft cloth or sponge with warm water and a drop of mild dish soap.
- Rinse thoroughly—pressure washers are a no-go.
- If grime persists, choose a vinyl-specific cleaner. Explore options at RV exterior cleaning products.
- Always finish with a gentle rinse to restore shine.
How To Properly Clean Acrylic Awnings
Acrylic’s strength is its breathability. Overwetting or harsh detergents strip the water-repellent layer and invite sagging.
- Mix mild soap with lukewarm water in a bucket.
- Gently scrub small sections using a soft-bristle brush.
- Let the fabric air-dry completely before rolling it up.
- When water stops beading, refresh with a spray-on treatment made for acrylic fabrics.
Don’t ever seal acrylic awnings with waterproof coatings. Their weave needs to breathe, or you’ll trap moisture inside and feed mildew.
These three habits—rinsing debris, ensuring proper drainage, and storing only when dry—are universal. Nail them, and your awning will stand strong against the elements.
Vinyl Vs Acrylic Awning Care Quick Guide
Below is a snapshot of each fabric’s needs so you can tailor your cleaning and upkeep routines.
| Care Aspect | Vinyl Awning | Acrylic Awning |
|---|---|---|
| Protective Finish | Clear topcoat blocks water and UV rays; prone to scratches | Dyed-through fibers with a water-repellent finish; allows airflow |
| Cleaning Agents | Mild dish soap, non-abrasive vinyl cleaners | Gentle soap only; no detergents or waterproof sealants |
| Tools | Soft cloths, sponges, garden hose | Soft-bristle brush, gentle rinse |
| Drying Method | Air-dry or wipe down; avoid standing water | Air-dry completely before storage |
| Maintenance Tips | Inspect for scratches; reapply vinyl protectant if available | Reapply water-repellent spray when beading diminishes |
By following these guidelines, you’ll dodge common pitfalls and dramatically extend your awning’s lifespan—whether it’s vinyl or acrylic.
Got Awning Questions? I've Got Answers
After years on the road, I've heard just about every question there is when it comes to awning care. It's funny how the same handful of queries pop up at every campground. People are often working off old myths or just aren't sure, and a bit of bad advice can lead to a costly mistake.
Let's clear the air and tackle some of the most common questions I get. Think of this as your personal cheat sheet for handling those tricky situations, so you can keep your awning looking great for years to come.
Can I Just Blast It With a Pressure Washer?
I'm going to give you a hard and fast no on this one. Using a pressure washer on your RV awning is probably the quickest way to destroy it. That high-powered stream of water is way too aggressive—it will shred the fabric, tear the stitching right out of the seams, and strip away the protective UV and water-resistant coatings.
It might be tempting to save time with a pressure washer, but you'll almost certainly be shopping for a new awning afterward. Stick with a regular garden hose and a spray nozzle. It has plenty of power to get the job done without damaging the material.
Seriously, How Often Do I Need to Clean This Thing?
When it comes to awning care, consistency beats intensity every time. I recommend giving it a good, deep clean twice a year: once when you kick off the camping season and again before you pack it in for the winter. If you’re a full-timer living the dream, plan on a deep wash every 3-4 months.
But the real secret to a low-maintenance awning is what you do between those big washes.
- Before you roll it up: Always give it a quick sweep to get rid of leaves, twigs, and loose dirt.
- When you see a spot: Deal with bird droppings or tree sap as soon as you notice them.
Staying on top of the little things makes a huge difference. It keeps stains from setting and prevents a little bit of grime from turning into a major cleaning project.
What's the Trick to Getting Rid of Sticky Tree Sap?
Tree sap is one of those messes where you need to work smart, not hard. If you start scrubbing aggressively, you'll just smear it deeper into the fabric and make a bigger mess.
Your best bet is to grab some rubbing alcohol or a citrus-based cleaner. Dab it onto the sap with a clean cloth and let it sit for a minute or two; this will start to break down the sticky resin. Then, gently blot at the spot, working from the outside of the stain toward the center to keep it from spreading. After the sap is gone, wash the area with your regular soap and water solution and give it a good rinse to get rid of any residue.
For a cleaning experience that’s both powerful and gentle, check out the foam gun from SwiftJet. It’s the perfect tool for applying your cleaning solution evenly and efficiently, making your next awning wash faster and more effective. Get yours today at SwiftJet's website.